Chapter 2 Building and operate a donkeycar
In December 2018 I switched from sunfounder to donkeycar Donkey Car
2.1 Reason for changing the plattform
The sunfounder was wonderful to learn the basics, PWM, I2C, use of camera with Pi, but had shortcomings in the steering mechanism. The steering angle was not reproducible, i.e. sending twice the same steering command did result in different steering angles of about a few degrees difference. Now since the aim of the game is to train a neural net which takes the commanded steering angle as ground truth this was a show stopper for me and therefore i moved to => Donkey Car
Second reason, other members of the group Esslinger Makerspace Projekt: Autonomen RoboCar bauen opted for donkey car.
2.1.1 Selecting a RC car
Selection criteria for RC car are:
- Brushed motor => no need for high speed
- NiMH battery => less sensitive to mechanical impact compared to Li-ion battery
- ESC not integrated into remote control receiver
- 3 wire steering servo
A great buying guide for RC-cars from the donkeycar project can be found at http://docs.donkeycar.com/roll_your_own/
I changed to Reely Dart 2.0 Brushed Tamiya-Buchse is the connector of the NiMH battery Charger is Voltcraft V-Charge Eco NiMh 3000
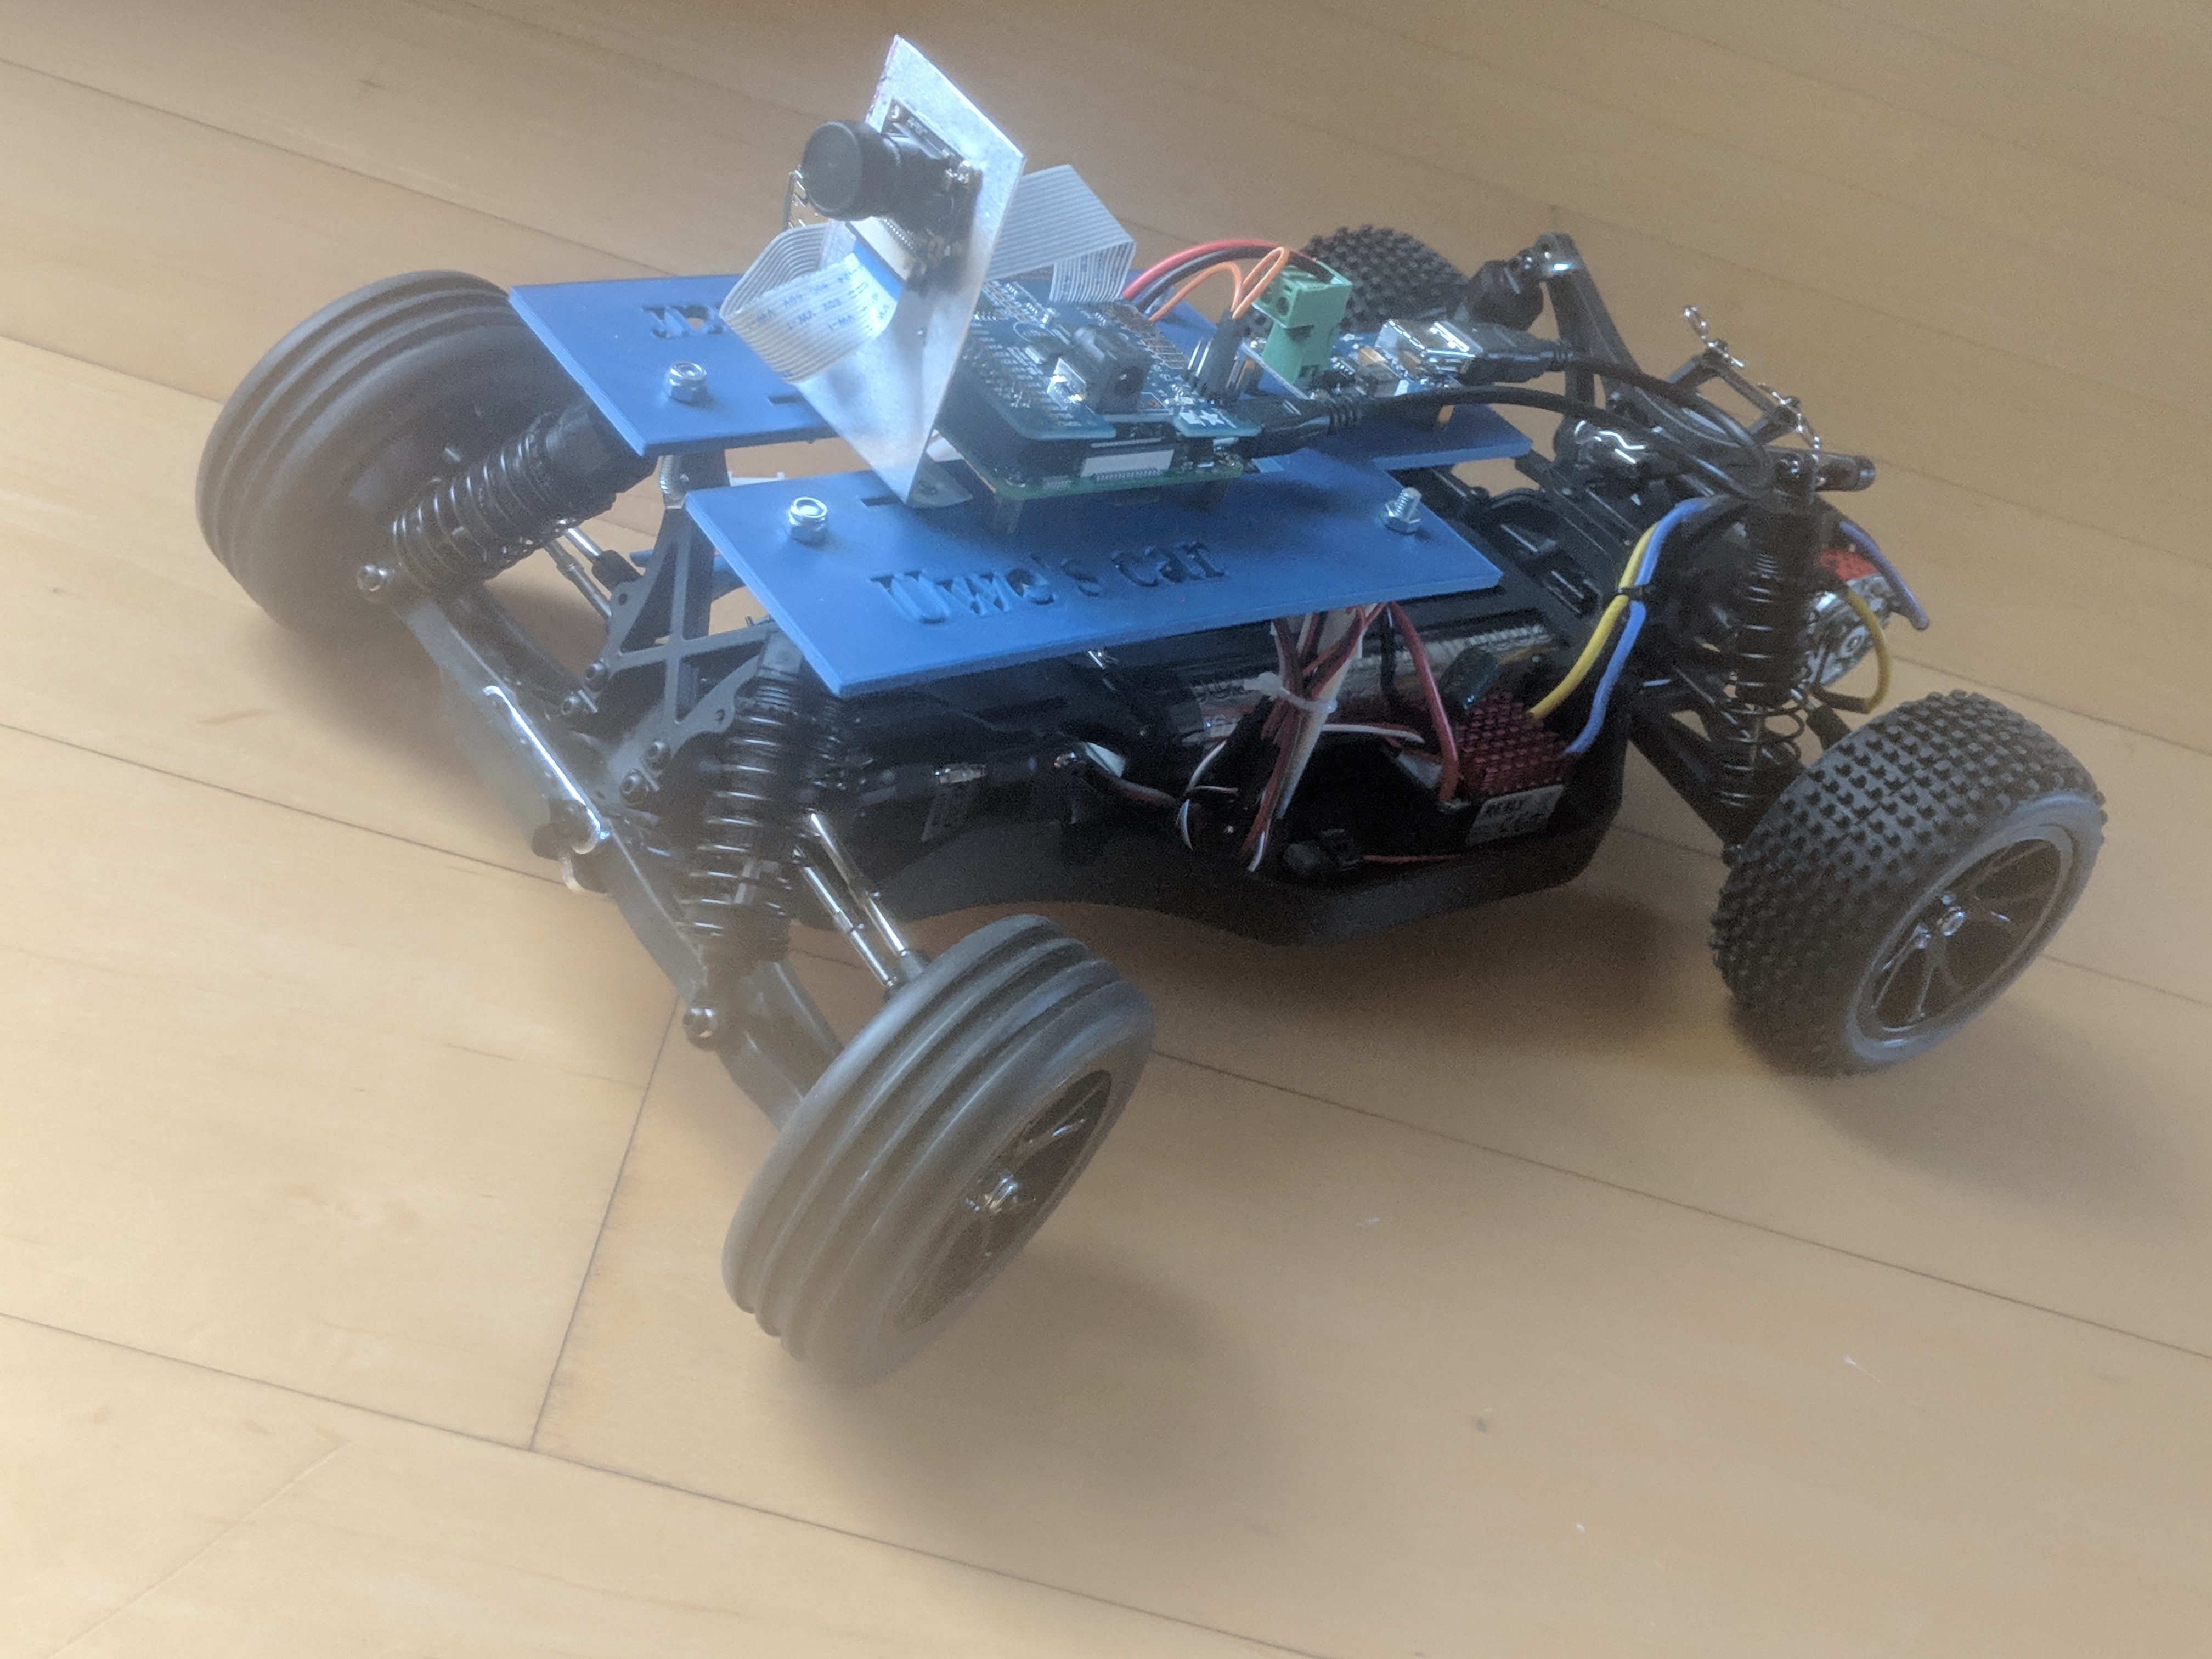
Figure 2.1: Reely Dart 2.0 Brushed converted RoboCar
2.2 What to do
disassemble the sunfounder, by taking of the plate on which the raspberry is mounted
disassemble the L298N H-bridge, not needed if you use an ESC
Rewire the PWM signal of the car
- channel 1 => steering
- channel 0 => throttle
Install Software on Pi and Host Computer
- Setup Raspberry Pi
- Setup Mac Host PC (or windows or Linux host)
Select web or physical controller Controller Parts
2.3 Rewiring the car
The rewiring consists of
- Disconnect the following connections
- PWM signal RC receiver => Steering Servo
- PWM signal RC receiver => ESC
- Connect
- Battery => DC/DC converter
- DC/DC converter => Raspberry Pi
- PWM Servo Hat onto Raspberry Pi
- PWM Servo Hat Ch 0 => ESC
- PWM Servo Hat Ch 1 => Steering Servo
- Raspberry Pi => Raspberry Pi camera
The resulting wiring diagram can be seen in figure 2.2
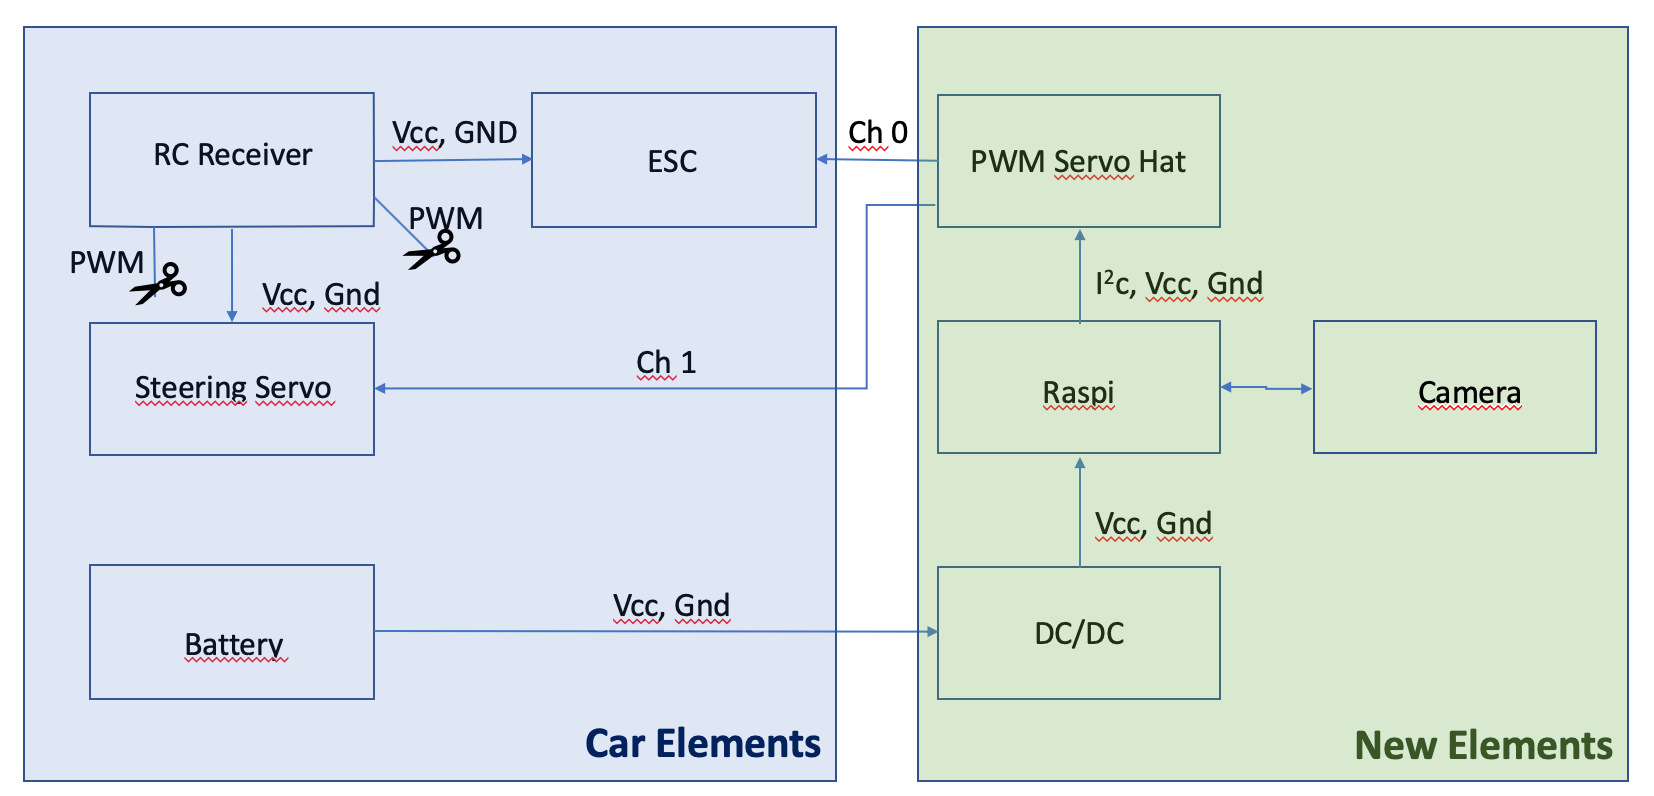
Figure 2.2: Wiring diagram after rewiring car
WARNING, don’t connect the red wire of the ESC to PWM Servo Hat, only the other two wires are needed between ESC to PWM Servo Hat
So there are only the PWM signal wires from the PWM Servo Hat to the car and the power supply needs to be connected to the DC/DC converter. A close-up on the PWM Servo Hat is given in figure 2.3
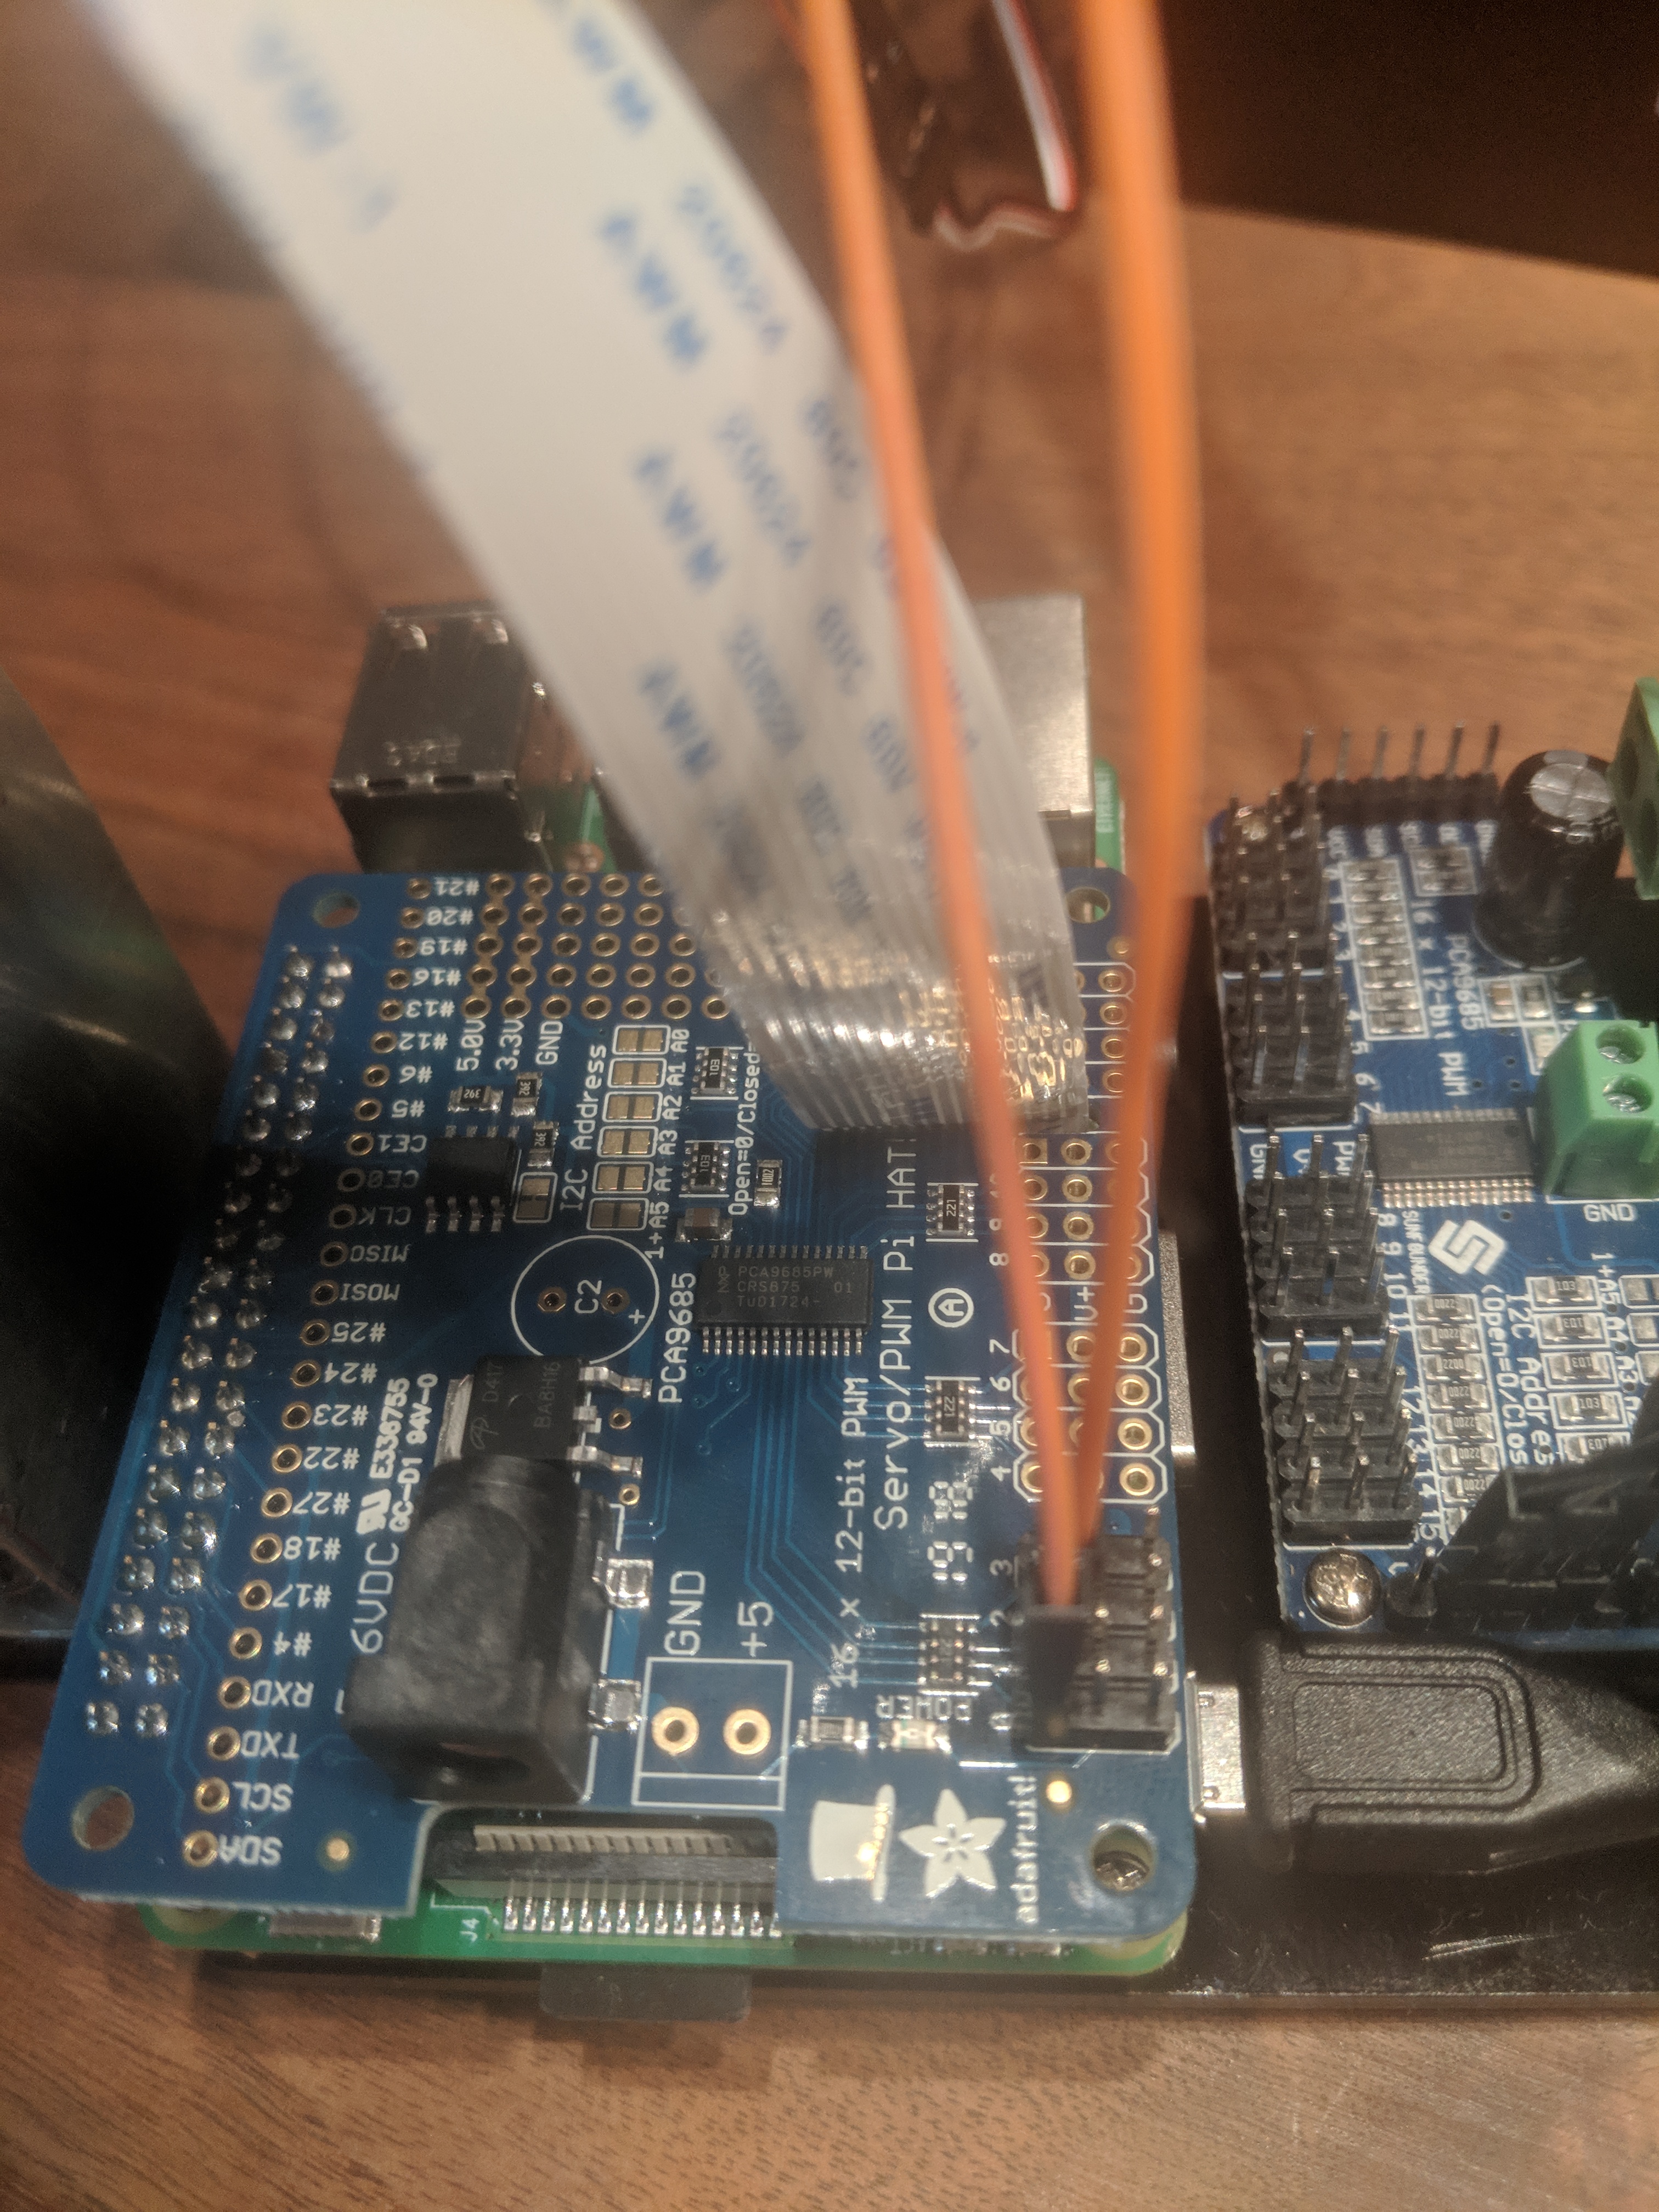
Figure 2.3: Close-up of PWM Servo Hat
You can eliminate the RC receiver altogether, see figure 2.4
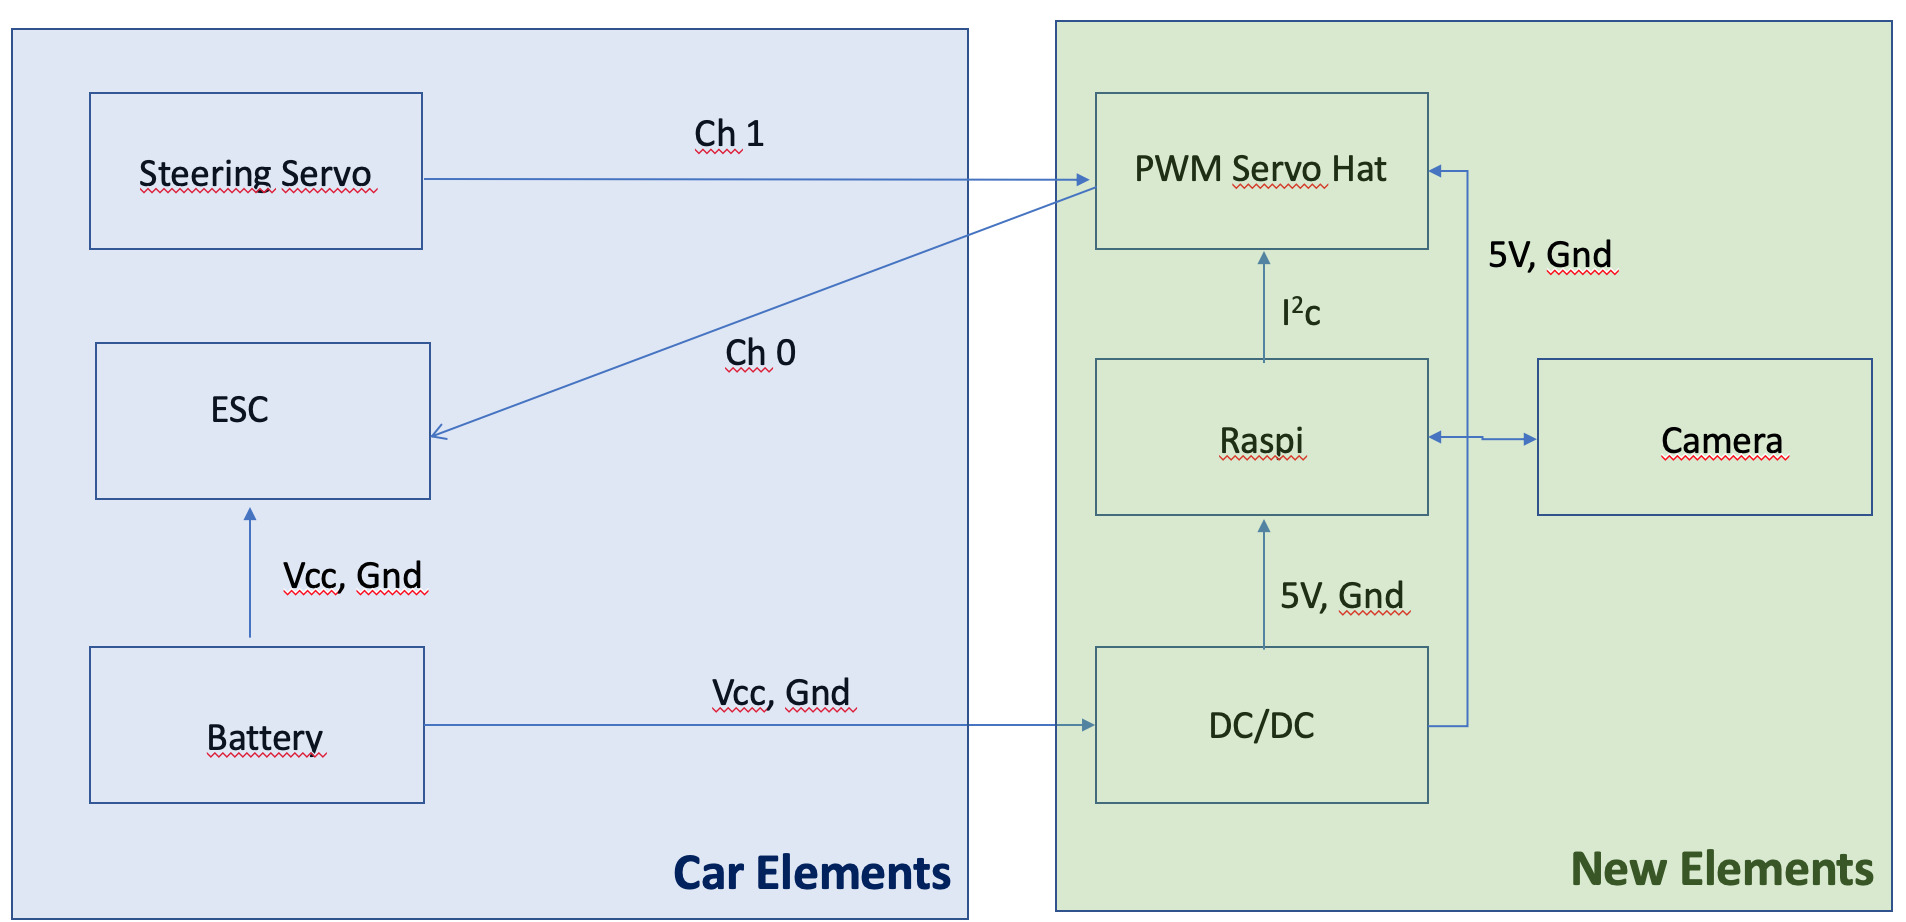
Figure 2.4: Rewiring without RC receiver
WARNING, don’t connect the red wire of the ESC to PWM Servo Hat, only the other two wires are needed between ESC to PWM Servo Hat
2.3.1 Parts list
The following list is what I used to build the car, this does not mean there are better and/or cheaper options available. In total the cost is about 250€.
Reely Dart 2.0 Brushed ca. 130€
Raspberry Pi ca. 34€
Raspbery Pi camera ca. 25€
PWM Servo Hat ca. 32€
DC/DC converter ca. 4€,
WiiU controller ca. 18€
Tamiya Stecker Power wires ca. 9€
Stuff to mechanically integrate the new elements into the car.
2.3.2 Why not using PCA9685
Note, there seems to be an issue with driving two servos with PCA9685 at the same time. What happens is that steering and throttle work during calibration but not when the car is controlled via the web interface. TBC
A possible cure is described at Adafruit 16 Channel Servo Driver with Raspberry Pi.
When to add an optional Capacitor to the driver board We have a spot on the PCB for soldering in an electrolytic capacitor. Based on your usage, you may or may not need a capacitor. If you are driving a lot of servos from a power supply that dips a lot when the servos move, n * 100uF where n is the number of servos is a good place to start - eg 470uF or more for 5 servos. Since its so dependent on servo current draw, the torque on each motor, and what power supply, there is no “one magic capacitor value” we can suggest which is why we don’t include a capacitor in the kit.
I did not check whether this works.
The now used PWM SERVO HAT 2327 By ADAFRUIT INDUSTRIES did not show any problem controlling two channels at the same time
2.4 Folders created during installation of host PC
- /Users/uwesterr/mycar/models
- /Users/uwesterr/mycar/data
- /Users/uwesterr/mycar/logs
2.5 Calibrate the car
Instructions for the calibrations can be found at http://docs.donkeycar.com/guide/calibrate/#calibrate-your-car
ssh into your raspberry
2.5.1 Setting WIFI up for the raspberry
To set up the WiFi connection on the raspberry you find a detailed description at SETTING WIFI UP VIA THE COMMAND LINE
2.5.2 Steering Calibration
To start steering calibration run
donkey calibrate --channel <your_steering_channel>PWM channel 1 for steering
donkey calibrate --channel 1(env) pi@donkeypi_uwe:~ $ donkey calibrate --channel 1
using donkey version: 2.5.8 ...
Enter a PWM setting to test(0-1500)360
Enter a PWM setting to test(0-1500)120
.
.
.Ctrl C to exit calibration mode
Values for my car:
- left:490
- right: 390
- stop 410
- slow forward 440
- slow reverse 390
- fast forward 550
- fast reverse 310
2.5.3 Throttle Calibration
To start throttle calibration run
donkey calibrate --channel <your_throttle_channel>PWM channel 0 for throttle
(env) pi@donkeypi_uwe:~ $ donkey calibrate --channel 0
using donkey version: 2.5.8 ...
Enter a PWM setting to test(0-1500)400
Enter a PWM setting to test(0-1500)420
Enter a PWM setting to test(0-1500)400
Enter a PWM setting to test(0-1500)380
2.5.4 Config.py after calibration
after configuration the config.py file reads
"""
CAR CONFIG

This file is read by your car application's manage.py script to change the car
performance.

EXMAPLE
-----------
import dk
cfg = dk.load_config(config_path='~/mycar/config.py')
print(cfg.CAMERA_RESOLUTION)

"""


import os

#PATHS
CAR_PATH = PACKAGE_PATH = os.path.dirname(os.path.realpath(__file__))
DATA_PATH = os.path.join(CAR_PATH, 'data')
MODELS_PATH = os.path.join(CAR_PATH, 'models')

#VEHICLE
DRIVE_LOOP_HZ = 20
MAX_LOOPS = 100000

#CAMERA
CAMERA_RESOLUTION = (120, 160) #(height, width)
CAMERA_FRAMERATE = DRIVE_LOOP_HZ

#STEERING
STEERING_CHANNEL = 1
STEERING_LEFT_PWM = 460
STEERING_RIGHT_PWM = 370

#THROTTLE
THROTTLE_CHANNEL = 0
THROTTLE_FORWARD_PWM = 550
THROTTLE_STOPPED_PWM = 410
THROTTLE_REVERSE_PWM = 320

#TRAINING
BATCH_SIZE = 128
TRAIN_TEST_SPLIT = 0.8


#JOYSTICK
USE_JOYSTICK_AS_DEFAULT = False
JOYSTICK_MAX_THROTTLE = 0.25
JOYSTICK_STEERING_SCALE = 1.0
AUTO_RECORD_ON_THROTTLE = True


TUB_PATH = os.path.join(CAR_PATH, 'tub') # if using a single tub
2.6 Drive your car with web interface
Instructions are at http://docs.donkeycar.com/guide/get_driving/
2.6.1 Preparation on Mac
- open terminal
- Activate mappings to donkey Python setup with:
source activate donkey - Change to your local dir for managing donkey:
cd ~/mycar
2.6.2 Preparation on Raspberry
cd ~/mycar
python manage.py drive
in the terminal window that looks like follows:
(env) pi@donkeypi_uwe:~/mycar $ python manage.py drive

using donkey version: 2.5.8 ...
/usr/lib/python3/dist-packages/h5py/__init__.py:34: FutureWarning: Conversion of the second argument of issubdtype from `float` to `np.floating` is deprecated. In future, it will be treated as `np.float64 == np.dtype(float).type`.
  from ._conv import register_converters as _register_converters
loading config file: /home/pi/mycar/config.py
config loaded
PiCamera loaded.. .warming camera
Starting Donkey Server...
You can now go to http://127.0.0.1:8887 to drive your car.
/home/pi/env/lib/python3.5/site-packages/picamera/encoders.py:544: PiCameraResolutionRounded: frame size rounded up from 160x120 to 160x128
  width, height, fwidth, fheight)))
2.6.3 Open control in web browser on Mac
You can now control your car from a web browser at the URL: 192.168.178.67:8887
2.7 Connecting bluetooth controller
I got an Wii U second hand WiiU controller, therefore I did select the Controllers page the WiiU controller
After ssh into the raspberry install Bluetooth Game Controller library
git clone https://github.com/autorope/donkeypart_bluetooth_game_controller.git
pip install -e ./donkeypart_bluetooth_game_controller
2.7.1 Connect your bluetooth controller to the raspberry pi.
- Start the Bluetooth bash tool on your raspberry pi.
sudo bluetoothctl
power on
scan on- Turn on your controller in scan mode and look for your controllers name in the bluetoothctl scan results. This is done by turning over the controller and pushing the sync button until the 4 blue buttons blink
In the shell the scan showed > [NEW] Device 0C:FC:83:97:A6:4F Nintendo RVL-CNT-01
- Connect to your controller using its id (my controller id is
0C:FC:83:97:A6:4F) once you’ve found it’s id. You may have to run these commands several times.
 pair 0C:FC:83:97:A6:4F
 connect 0C:FC:83:97:A6:4F
 trust 0C:FC:83:97:A6:4F
Now your controller should show that your controller is connected - the 4 blinking lights turns to one solid light.
Run the part script to see if it works. You should see all the button values printed as you press them. Like this.
cd donkeypart_bluetooth_game_controller/donkeypart_bluetooth_game_controller
(env) pi@donkeypi_uwe:~/donkeypart_bluetooth_game_controller/donkeypart_bluetooth_game_controller $ python part.py log
Please give a string that can identify the bluetooth device (ie. nintendo)nintendo
log
device /dev/input/event0, name "Nintendo Wii Remote Pro Controller", phys ""
button: LEFT_STICK_X, value:-0.009375
button: LEFT_STICK_X, value:-0.0015625
button: LEFT_STICK_X, value:-0.00390625
button: LEFT_STICK_X, value:-0.00546875
button: LEFT_STICK_X, value:-0.00703125
How to add the Bluetooth controller into manage.pyis described in section 5.1.3.3
In the file manageOrgExtWii.py the Bluetooth controller was integrated.
2.8 Start driving or training
Before start driving it might be a good idea to limit the max velocity, this can be done as described in 5.6
- Power up donkeycar
- Wait about 10s until Raspberry Pi is booted
- Switch on Bluetooth controller
- for Nintendo Wii controller
- the four blue LEDs flash a few times
- the left most LED solid shows that controller is connected with Raspberry Pi
Once controller is connected proceed as described in instructions
ssh pi@<your_pi_ip_address>
# or
ssh pi@donkeypi-uwe

cd ~/mycar
python manage.py drive
# or if you have changed the file name to indicate that you added the bluetooth contorller
python manageOrgExtWii.py drive
how to the the IP address of your car you check your at your router. How to do this at shackspace is described 9.4
And the car drives
add Bluetooth controller to manage.py https://github.com/autorope/donkey2_plus/blob/690ff1b78c49c2a3dd4c1095bfcac9673f150804/manage.py
2.8.1 Create movie from tub data
To create a movie from the gathered data
donkey makemovie <tub_path> [--out=<tub_movie.mp4>]
# for example create movie tubMovie.mp4 from data located at tub
source activate donkey
donkey makemovie --tub tub --out tubMovie.mp4
More details at http://docs.donkeycar.com/utility/donkey/#make-movie-from-tub
2.8.2 Options of manage.py
The script manage.py can be called with several options, to find them type
(env) pi@donkeypi_uwe:~/mycar $ python manage.py drive --husing donkey version: 2.5.8 … /usr/lib/python3/dist-packages/h5py/init.py:34: FutureWarning: Conversion of the second argument of issubdtype from
floattonp.floatingis deprecated. In future, it will be treated asnp.float64 == np.dtype(float).type. from ._conv import register_converters as _register_converters Scripts to drive a donkey 2 car and train a model for it.
Usage:
    manage.py (drive) [--model=<model>] [--js] [--chaos]
    manage.py (train) [--tub=<tub1,tub2,..tubn>]  (--model=<model>) [--base_model=<base_model>] [--no_cache]

Options:
    -h --help        Show this screen.
    --tub TUBPATHS   List of paths to tubs. Comma separated. Use quotes to use wildcards. ie "~/tubs/*"
    --js             Use physical joystick.
    --chaos          Add periodic random steering when manually driving
2.9 Tips on how to drive during training
Here are a few tips on how to gather the necessary training data. The tips are based on a video by Tawn Kramer Driving Tips to Train your Autonomous End-to-End NN Driver
- create about 10,000 images
- four different driving modes, more don’t hurt
- do some driving to get used to the control
- divide training session into four parts
- drive slowly precisely center of the lane
- about two laps
- about 10% of the data
- drive in lane with small oscillations
- shows NN how track looks like at different angles
- shows NN how to correct back to center
- about 2-3 laps
- drive like you normally drive
- speed a little bit
- not always bang center of lane
- drive with slow oscillations
- bounce back and forth between extremes of the lanes
- help NN to establish the lane boundaries
- drive slowly precisely center of the lane
The resulting steering angle histogram is shown in figure 2.5
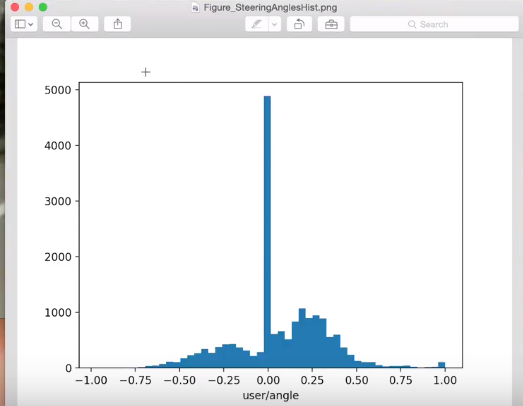
Figure 2.5: Steering angle histogramm of Tawn Kramer’s training data
- About 50% are straight driving
- Two humps from the oscillating driving
- Right hump more prominent since course has more right bends
2.9.1 How to edit recorded data
The donkey car utility tubclean is described in chapter 4.7
2.10 Mange recorded data
The training data is being stored in the folder /mycar/tub.
Since there might be a lot of data after a while you might want to
- delete
- archive
- copy it from the Raspberry Pi to your computer
data
2.10.1 Archiving data
Archiving can be done by renaming the tub folder with the mv command. The mv command moves, or renames, files and directories on your file system. To move the tub folder, i.e rename it, to tubArchive use
mv tub tubArchivemore details on mv can be found at https://www.computerhope.com/unix/umv.htm
2.10.2 Delete data
Once you want to get rid of the data use the following command
rm -rf tubMore on rm can be found at https://www.computerhope.com/unix/urm.htm
2.10.3 Copy files from raspi to mac
Open terminal on Mac Docy of scp command to copy file from pi to mac run in terminal
scp pi@192.168.178.67:mycar/manage.pythen type the password of the pi, afterwards the the file mycar/manage.py is being copied to the current location. The current location can be found via the pwdcommand.
Or run rsyncin terminal on Mac
rsync -r pi@192.168.178.67:~/mycar/tub/ ~/mycar/tubMac/You will be prompted for the raspi password.
All files from the raspi folder ~/mycar/tub/ will be copied to the folder ~/mycar/tubMac/on the Mac
2.10.4 How big is the tub folder
If you want to know how many MB of data you collected already use the su command. More info on the su command here
(env) pi@donkeypi_uwe:~/mycar $ du -sh tub
232M    tub
2.11 Train neural network
A description is given in the donkeycar documentation
Below an example for the case that all training data are located in a single folder named tub.
To train a neural network:
- change to directory where tub is located
- activate donkey environment
source activate donkey
run
(donkey) Uwes-MacBook-Pro:mycar uwesterr$ python ~/mycar/manage.py train --tub tub --model ./models/mypilotor maybe better readable:
model_type = "linear" # linear|categorical|rnn|imu|behavior|3d|localizer|latent
model_path = "/content/mycar/models/mypilot.h5"
tub_path = "/content/mycar/data/tub_1_19_10_27,/content/mycar/data/tub_2_19_10_27"

%cd /content/mycar
python manage.py train --model={model_path} --type={model_type} --tub={tub_path}
which will place a model file called mypilot at
(donkey) Uwes-MacBook-Pro:models uwesterr$ pwd
/Users/uwesterr/mycar/models
(donkey) Uwes-MacBook-Pro:models uwesterr$ ls
mypilot
the command to train the neural network leads to the following output in the terminal window
(donkey) Uwes-MacBook-Pro:mycar uwesterr$  python ~/mycar/manage.py train --tub tub --model ./models/mypilot
using donkey version: 2.5.7 ...
loading config file: /Users/uwesterr/mycar/config.py
config loaded
tub_names tub
train: 4497, validation: 1125
steps_per_epoch 35
Epoch 1/100
2019-04-12 16:14:59.549618: I tensorflow/core/platform/cpu_feature_guard.cc:140] Your CPU supports instructions that this TensorFlow binary was not compiled to use: AVX2 FMA
34/35 [============================>.] - ETA: 0s - loss: 15.0006 - angle_out_loss: 12.5454 - throttle_out_loss: 17.4558
Epoch 00001: val_loss improved from inf to 0.37914, saving model to ./models/mypilot
35/35 [==============================] - 29s 815ms/step - loss: 14.5843 - angle_out_loss: 12.2074 - throttle_out_loss: 16.9612 - val_loss: 0.3791 - val_angle_out_loss: 0.5718 - val_throttle_out_loss: 0.1865
Epoch 2/100
34/35 [============================>.] - ETA: 0s - loss: 0.3353 - angle_out_loss: 0.5307 - throttle_out_loss: 0.1398
Epoch 00002: val_loss improved from 0.37914 to 0.29204, saving model to ./models/mypilot
35/35 [==============================] - 31s 874ms/step - loss: 0.3338 - angle_out_loss: 0.5289 - throttle_out_loss: 0.1387 - val_loss: 0.2920 - val_angle_out_loss: 0.4629 - val_throttle_out_loss: 0.1212
The model is defined in keras.py
class KerasLinear(KerasPilot):
    '''
    The KerasLinear pilot uses one neuron to output a continous value via the
    Keras Dense layer with linear activation. One each for steering and throttle.
    The output is not bounded.
    '''
    def __init__(self, num_outputs=2, input_shape=(120, 160, 3), roi_crop=(0, 0), *args, **kwargs):
        super(KerasLinear, self).__init__(*args, **kwargs)
        self.model = default_n_linear(num_outputs, input_shape, roi_crop)
        self.compile()

    def compile(self):
        self.model.compile(optimizer=self.optimizer,
                loss='mse')

    def run(self, img_arr):
        img_arr = img_arr.reshape((1,) + img_arr.shape)
        outputs = self.model.predict(img_arr)
        steering = outputs[0]
        throttle = outputs[1]
        return steering[0][0], throttle[0][0]
def default_n_linear(num_outputs, input_shape=(120, 160, 3), roi_crop=(0, 0)):
drop = 0.1
#we now expect that cropping done elsewhere. we will adjust our expeected image size here:
input_shape = adjust_input_shape(input_shape, roi_crop)
img_in = Input(shape=input_shape, name='img_in')
x = img_in
x = Convolution2D(24, (5,5), strides=(2,2), activation='relu', name="conv2d_1")(x)
x = Dropout(drop)(x)
x = Convolution2D(32, (5,5), strides=(2,2), activation='relu', name="conv2d_2")(x)
x = Dropout(drop)(x)
x = Convolution2D(64, (5,5), strides=(2,2), activation='relu', name="conv2d_3")(x)
x = Dropout(drop)(x)
x = Convolution2D(64, (3,3), strides=(1,1), activation='relu', name="conv2d_4")(x)
x = Dropout(drop)(x)
x = Convolution2D(64, (3,3), strides=(1,1), activation='relu', name="conv2d_5")(x)
x = Dropout(drop)(x)
x = Flatten(name='flattened')(x)
x = Dense(100, activation='relu')(x)
x = Dropout(drop)(x)
x = Dense(50, activation='relu')(x)
x = Dropout(drop)(x)
outputs = []
for i in range(num_outputs):
outputs.append(Dense(1, activation='linear', name='n_outputs' + str(i))(x))
model = Model(inputs=[img_in], outputs=outputs)
return model2.11.1 Add augmentation
Adding augmentation should lead to a more robust model, to invoke augmentation set the flag --aug when calling manage.py
python /content/mycar/manage.py train --type=linear --model=/content/mycar/models/mypilot.h5 --augthen the function augment_image from augment.py will be applied to the images during training
def augment_image(np_img, shadow_images=None, do_warp_persp=False):
    conv_img = np_img * 255.0
    conv_img = conv_img.astype(np.uint8)
    img = Image.fromarray(conv_img)
    #change the coloration, sharpness, and composite a shadow
    factor = random.uniform(0.5, 2.0)
    img = ImageEnhance.Brightness(img).enhance(factor)
    factor = random.uniform(0.5, 1.0)
    img = ImageEnhance.Contrast(img).enhance(factor)
    factor = random.uniform(0.5, 1.5)
    img = ImageEnhance.Sharpness(img).enhance(factor)
    factor = random.uniform(0.0, 1.0)
    img = ImageEnhance.Color(img).enhance(factor)

    if shadow_images is not None:
        '''
        optionaly composite a shadow, perpared from load_shadow_images
        '''
        iShad = random.randrange(0, len(shadow_images))
        top, mask = shadow_images[iShad]
        theta = random.randrange(-35, 35)
        mask.rotate(theta)
        top.rotate(theta)
        mask = ImageEnhance.Brightness(mask).enhance(random.uniform(0.3, 1.0))
        offset = (random.randrange(-128, 128), random.randrange(-128, 128))
        img.paste(top, offset, mask)

    if do_warp_persp:
        '''
        optionaly warp perspective
        '''
        img = rand_persp_transform(img)

    return np.array(img).astype(np.float) / 255.0
which is called from train.py
 if aug:
     img_arr = augment_image(img_arr)
2.11.2 Transfer learning
The neural network can also be trained using a pre-trained network using the manage.pyscript with the flag [--transfer=<model>]
manage.py (train) [--tub=<tub1,tub2,..tubn>] [--file=<file> ...] (--model=<model>) [--transfer=<model>] [--type=(linear|categorical|rnn|imu|behavior|3d|localizer)] [--continuous] [--aug]
manage.py train  --type=linear --transfer=base_linear.h5  --model=/content/mycar/models/mypilot.h5 --aug
To control the transfer learning change settings in myconfig.py
# #Model transfer options
# #When copying weights during a model transfer operation, should we freeze a certain number of layers
# #to the incoming weights and not allow them to change during training?
FREEZE_LAYERS = False               #default False will allow all layers to be modified by training
NUM_LAST_LAYERS_TO_TRAIN = 7        #when freezing layers, how many layers from the last should be allowed to train?
The above parameters are used in train.py to control the training of the model
    if transfer_model:
        print('loading weights from model', transfer_model)
        kl.load(transfer_model)

        #when transfering models, should we freeze all but the last N layers?
        if cfg.FREEZE_LAYERS:
            num_to_freeze = len(kl.model.layers) - cfg.NUM_LAST_LAYERS_TO_TRAIN
            print('freezing %d layers' % num_to_freeze)
            for i in range(num_to_freeze):
                kl.model.layers[i].trainable = False
As a starting point Tawn also offers a .h5 model base_linear.h5 which can be downloaded from
https://drive.google.com/open?id=18Qfc_T5fpUmuTqXFZbJZrQhlf2l3S0VK
The model can be invoked by
manage.py train --type=linear --transfer=base_linear.h5 --model=/content/mycar/models/mypilot.h5 --aug2.12 Run car on neural net
Run the following command on the raspberry pi.
(env) pi@donkeypi_uwe:~/mycar $ python manage.py drive --js --model ~/mycar/models/vaihingenIII.h5Toggle drive mode by pressing button ‘A’, the modes are toggles between three states
- Throttle and steering WiiU controlled
- Throttle WiiU controlled and steering controlled by neural net
- Throttle and steering controlled by neural net
The modes have names and are defined:
User : As you guessed, this is where you are in control of both the steering and throttle control.
Local Angle : Not too obvious, but this is where the trained model (mypilot from above) controls the steering. The Local refers to the trained model which is locally hosted on the raspberry-pi.
Local Pilot : This is where the trained model (mypilot) assumes control of both the steering and the throttle. As of now, it’s purportedly not very reliable.
2.12.1 change model
change in
/Users/uwesterr/CloudProjectsUnderWork/ProjectsUnderWork/RoboCar/donkeycar/donkeycar-1/donkeycar/parts/the file keras.pyto tawn kramers keras.py which has dropout in the model. The file can be found at github https://github.com/tawnkramer/donkey/blob/master/donkeycar/parts/keras.py
Model doesnt work with donkeycar installation on raspi, change to tawn kramer installation
2.13 See Rainer’s description
https://github.com/tawnkramer/donkey/blob/master/docs/guide/install_software.md
name of new installation donkeyUweTk
(env) pi@donkeyUweTk:~/donkey/donkeycar/parts $ ls
__init__.py  augment.py   controller.py  dgym.py          graph.py  keras.py       network.py  simulation.py       transform.py
__pycache__  behavior.py  cv.py          encoder.py       image.py  led_status.py  ros.py      teensy.py           web_controller
actuator.py  camera.py    datastore.py   file_watcher.py  imu.py    lidar.py       salient.py  throttle_filter.py
add Wii U controller instruction https://github.com/autorope/donkeypart_bluetooth_game_controller
2.14 Build pre processing pipe line
First step is to install openCV on the raspi so that the images recorded by the camera can be processed before they are stored.
2.14.1 Install openCV on the raspi
To add a pre-processing pipe line we need openCV. To intsall opencv on the raspberry
pip install opencv-python
2.15 bluetooth key mapping
For Tawn Kramer’s version of donkeycar the following key mappings are valid for the Wii U
- X: erased last 100 records.
- B: E-Stop!!!
- “-” new mode: local_angle
- again “-” new mode: local
- Left cross:
- up: increase throttle_scale
- down decrease throttle_scale
2.16 Load h5 model and inspect
from tensorflow.python.keras.models import load_model

model1 = load_model("base_linearTawnKramer.h5")
model1.summary()
you get
__________________________________________________________________________________________________
Layer (type)                    Output Shape         Param #     Connected to
==================================================================================================
img_in (InputLayer)             (None, 120, 160, 3)  0
__________________________________________________________________________________________________
cropping2d (Cropping2D)         (None, 120, 160, 3)  0           img_in[0][0]
__________________________________________________________________________________________________
batch_normalization_v1 (BatchNo (None, 120, 160, 3)  12          cropping2d[0][0]
__________________________________________________________________________________________________
conv2d_1 (Conv2D)               (None, 58, 78, 24)   1824        batch_normalization_v1[0][0]
__________________________________________________________________________________________________
dropout (Dropout)               (None, 58, 78, 24)   0           conv2d_1[0][0]
__________________________________________________________________________________________________
conv2d_2 (Conv2D)               (None, 27, 37, 32)   19232       dropout[0][0]
__________________________________________________________________________________________________
dropout_1 (Dropout)             (None, 27, 37, 32)   0           conv2d_2[0][0]
__________________________________________________________________________________________________
conv2d_3 (Conv2D)               (None, 12, 17, 64)   51264       dropout_1[0][0]
__________________________________________________________________________________________________
dropout_2 (Dropout)             (None, 12, 17, 64)   0           conv2d_3[0][0]
__________________________________________________________________________________________________
conv2d_4 (Conv2D)               (None, 10, 15, 64)   36928       dropout_2[0][0]
__________________________________________________________________________________________________
dropout_3 (Dropout)             (None, 10, 15, 64)   0           conv2d_4[0][0]
__________________________________________________________________________________________________
conv2d_5 (Conv2D)               (None, 8, 13, 64)    36928       dropout_3[0][0]
__________________________________________________________________________________________________
dropout_4 (Dropout)             (None, 8, 13, 64)    0           conv2d_5[0][0]
__________________________________________________________________________________________________
flattened (Flatten)             (None, 6656)         0           dropout_4[0][0]
__________________________________________________________________________________________________
dense (Dense)                   (None, 100)          665700      flattened[0][0]
__________________________________________________________________________________________________
dropout_5 (Dropout)             (None, 100)          0           dense[0][0]
__________________________________________________________________________________________________
dense_1 (Dense)                 (None, 50)           5050        dropout_5[0][0]
__________________________________________________________________________________________________
dropout_6 (Dropout)             (None, 50)           0           dense_1[0][0]
__________________________________________________________________________________________________
n_outputs0 (Dense)              (None, 1)            51          dropout_6[0][0]
__________________________________________________________________________________________________
n_outputs1 (Dense)              (None, 1)            51          dropout_6[0][0]
==================================================================================================
Total params: 817,040
Trainable params: 817,034
Non-trainable params: 6